
Photography Friday: Photoshop Secrets...
Yes, I know I'm a day late. I honestly tried several times to sit down and do this yesterday but it just never happened! Sorry!
So I'll give away a few little secrets, will that help? =)
RAW vs. JPEG
There isn't anything wrong with shooting jpg but if you can shoot in RAW, it will help you out a ton if you happend to make a mistake on an important shot. When you shoot in RAW, you are saving ALL of the data your camera used to process the image. Jpg takes that info and compresses it to a more manageable size. This is why you get twice as many jpg images per memory card compared to RAW images.
All those settings you used to get your shot: White Balance, exposure selections... they can still be altered if you shot in RAW. Now with the higher end Photoshop programs, you can edit your jpg images but sometimes it can still be a bit limiting if you really messed up an image when you shot it.
I'm a big fan of getting it right in camera. If I can save time by not having to sit in front of the computer struggling to get an image just right, I'm a happy camper! I started with Photoshop Elements 2.0 years ago... is that like the first Photoshop or what? I did not have the option to work with RAW images. But now with CS3, I have that option and it makes my life so much easier! HOWEVER, you do NOT need to run out and purchase this expensive software unless you are shooting professionally and have TONS of image to edit at a time. Or you just like to spend money to get what everyone else has. I don't advocate the latter either.
Just to give you a little sampling of some basic processing, I will start with my RAW image and I opened it up in ACR - Adobe Camera RAW:
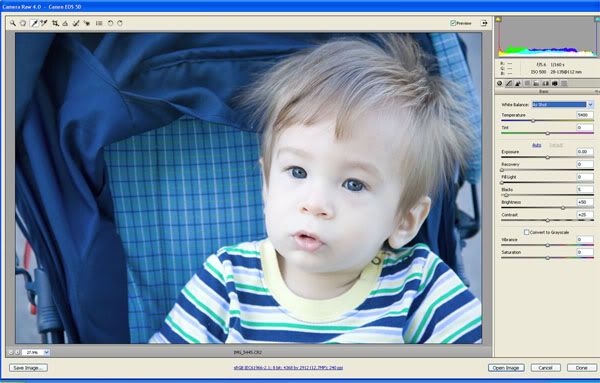
Now, I see that he looks a little too cool (blue) for my taste. I shot it with Auto White Balance and my camera read the color temperature of the setting differently that I would have. So I need to change that.
One easy way to do so is to use the white balance tool thingie (not so correct term). I use that tool to select something white, black or grey:
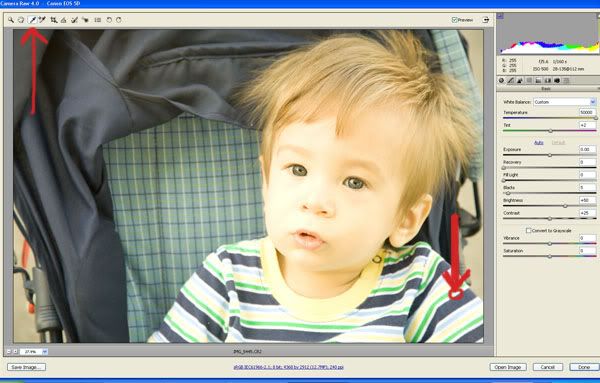
I used the white on his shirt but as you can see, that didn't help me.
So I chose something else. He is close enough that I can see his pupil pretty well and that is obviously black so I tried that:
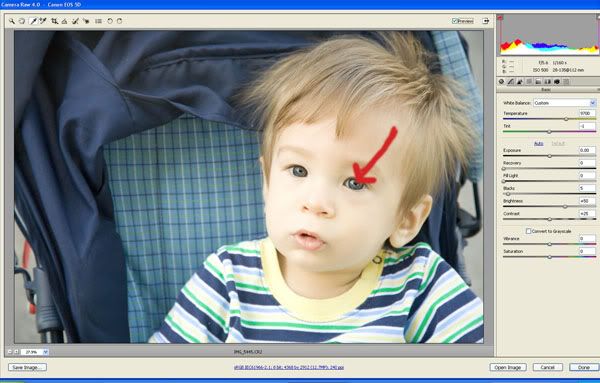
Much better. You can also select from the drop down menu on the far right a new white balance such as daylight or flourescent, depending on your lighting situation. I could have used "Shade" for this one.
I thought he was a bit dark so I adjusted the brightness and then added a hint of contrast by adjusting the blacks:
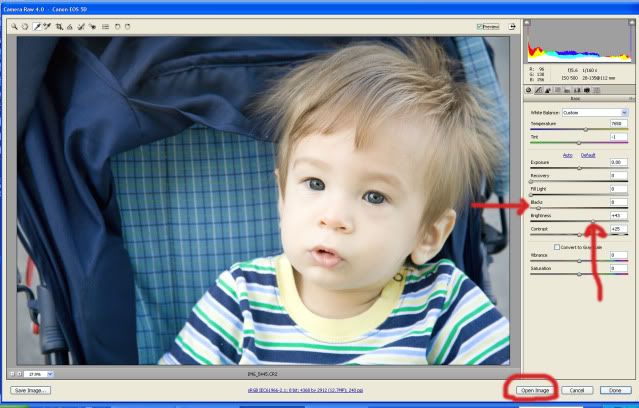
Then I clicked "Open image" and brought it to my Photoshop program.
I wanted to pop his eyes a bit to make them stand out more and bring out those catchlights so I created a levels adjustment layer:
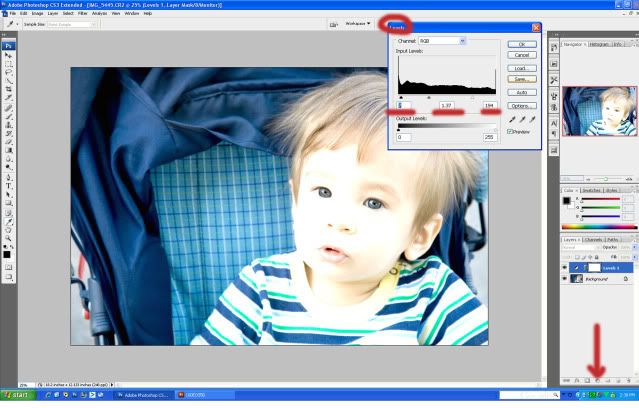
I clicked the black/white circle at the bottom of the layers palette and chose "levels". Then I brigthened up the image and increased the contrast. Under the graph are three sliders. I moved the one on the far right (white) to the left a bit to brighten up the image like crazy. Then I moved the far left one (black) to the right to darken the dark lines (black lines). Then I moved the middle one to the left slightly to brighten up just a tad more. Click OK and you now have a really bad looking image. So, hold down the ctrl key and click "i" and it will invert the layer and it will go back to "normal".
Next I chose a white brush and brushed his eye. This is kind of like erasing the original and bringing in the funky bright layer we just created:
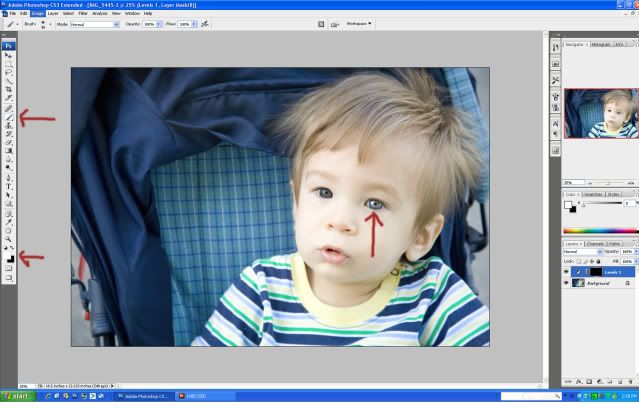
He's looking rather freaky now, eh?
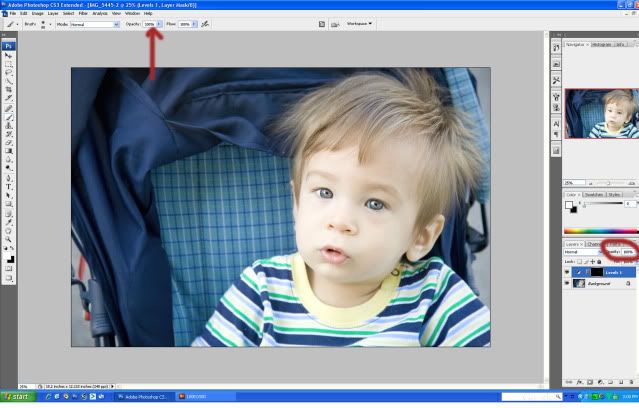
I do this with both eyes and since it's way too bright, I adjust the opacity of the layer. I happened to do this with the brush set on 100% before brushing. I don't always do this, actually, I usually use a lower opacity. But you can adjust the intensity of this change either place.
So I adjust the opacity so he's not so alien looking. Then I flatten the image, burn the edges a bit to make him stand out more than the busy pattern of the stoller and I crop to the size I need, resize for web, sharpen for web and viola! Here is what I ended up with after that short little processing jaunt (I know it didn't seem short but I have this eye pop thing as an action and it's one click and I'm done. This seriously would take me like a minute from start to finish.)
So I'll give away a few little secrets, will that help? =)
RAW vs. JPEG
There isn't anything wrong with shooting jpg but if you can shoot in RAW, it will help you out a ton if you happend to make a mistake on an important shot. When you shoot in RAW, you are saving ALL of the data your camera used to process the image. Jpg takes that info and compresses it to a more manageable size. This is why you get twice as many jpg images per memory card compared to RAW images.
All those settings you used to get your shot: White Balance, exposure selections... they can still be altered if you shot in RAW. Now with the higher end Photoshop programs, you can edit your jpg images but sometimes it can still be a bit limiting if you really messed up an image when you shot it.
I'm a big fan of getting it right in camera. If I can save time by not having to sit in front of the computer struggling to get an image just right, I'm a happy camper! I started with Photoshop Elements 2.0 years ago... is that like the first Photoshop or what? I did not have the option to work with RAW images. But now with CS3, I have that option and it makes my life so much easier! HOWEVER, you do NOT need to run out and purchase this expensive software unless you are shooting professionally and have TONS of image to edit at a time. Or you just like to spend money to get what everyone else has. I don't advocate the latter either.
Just to give you a little sampling of some basic processing, I will start with my RAW image and I opened it up in ACR - Adobe Camera RAW:
Now, I see that he looks a little too cool (blue) for my taste. I shot it with Auto White Balance and my camera read the color temperature of the setting differently that I would have. So I need to change that.
One easy way to do so is to use the white balance tool thingie (not so correct term). I use that tool to select something white, black or grey:
I used the white on his shirt but as you can see, that didn't help me.
So I chose something else. He is close enough that I can see his pupil pretty well and that is obviously black so I tried that:
Much better. You can also select from the drop down menu on the far right a new white balance such as daylight or flourescent, depending on your lighting situation. I could have used "Shade" for this one.
I thought he was a bit dark so I adjusted the brightness and then added a hint of contrast by adjusting the blacks:
Then I clicked "Open image" and brought it to my Photoshop program.
I wanted to pop his eyes a bit to make them stand out more and bring out those catchlights so I created a levels adjustment layer:
I clicked the black/white circle at the bottom of the layers palette and chose "levels". Then I brigthened up the image and increased the contrast. Under the graph are three sliders. I moved the one on the far right (white) to the left a bit to brighten up the image like crazy. Then I moved the far left one (black) to the right to darken the dark lines (black lines). Then I moved the middle one to the left slightly to brighten up just a tad more. Click OK and you now have a really bad looking image. So, hold down the ctrl key and click "i" and it will invert the layer and it will go back to "normal".
Next I chose a white brush and brushed his eye. This is kind of like erasing the original and bringing in the funky bright layer we just created:
He's looking rather freaky now, eh?
I do this with both eyes and since it's way too bright, I adjust the opacity of the layer. I happened to do this with the brush set on 100% before brushing. I don't always do this, actually, I usually use a lower opacity. But you can adjust the intensity of this change either place.
So I adjust the opacity so he's not so alien looking. Then I flatten the image, burn the edges a bit to make him stand out more than the busy pattern of the stoller and I crop to the size I need, resize for web, sharpen for web and viola! Here is what I ended up with after that short little processing jaunt (I know it didn't seem short but I have this eye pop thing as an action and it's one click and I'm done. This seriously would take me like a minute from start to finish.)
Before:
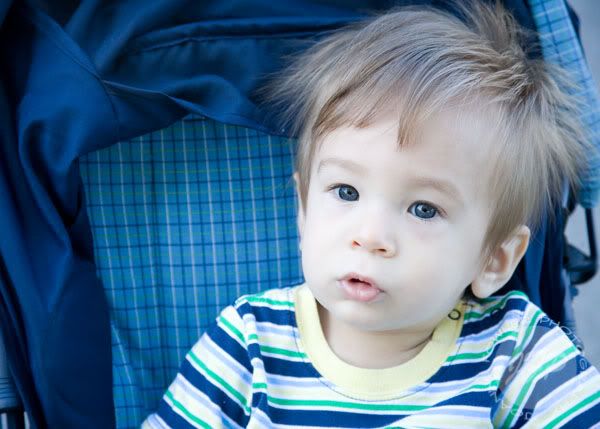
After:
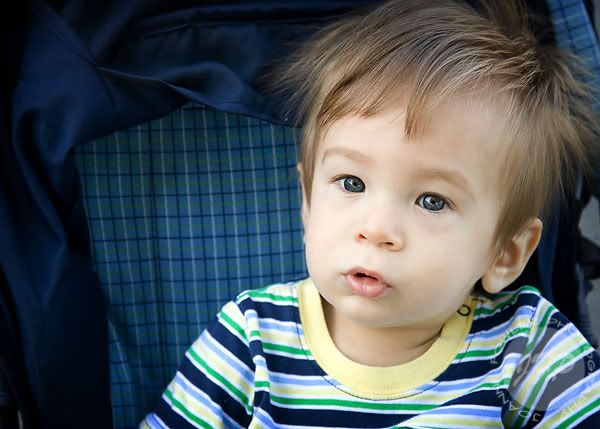
After:
So for those of you that want to give up because you don't have a big fancy camera... get creative and find other ways to get the job done! =)